Improve your renders with reflection maps
 |
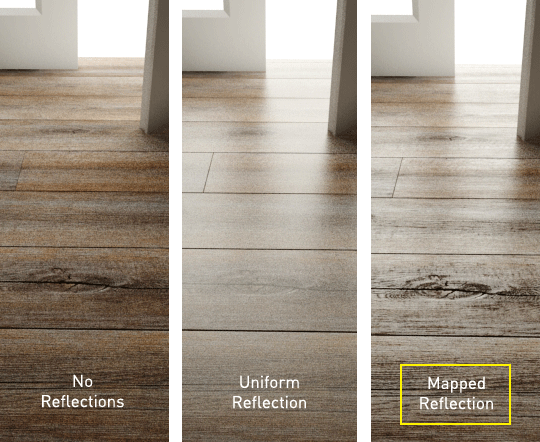
This is the perfect image to say something about the Reflection Maps.
But for aged wood simulation, uniform reflections is not the right solution. We need to controls the reflecions, making some points more reflective than others. The knots of the wood – for example – must reflect much less. This can easily be achieved by inserting another map in the ‘REFLECTION’ slot.For this material we will use 2 simple maps:1 – One in the Diffuse channel (where usually we have the classic textures)
2 – Another in the Reflecion channelThat’s how they look, just to figure out: (yes, yes .. after you download;-)
1) No reflections: it looks strange. Light is missing on its surface.2) Uniform Reflections: just Glossy 0,75. Good for new floors.3) Mapped Reflections: Glossy 0,75 + Reflection Map: Good for aged floors.Of course you have to play with these parameters to find the right balance. Sometimes copying this maps also in RGlossiness and Bump channels is helpful. You just have to try and play around.Usually, the reflection maps are ready to use in the materials in libraries you can buy online. They often have the suffix _refl or _reflection. If you want to create your own map by photoshop: start with black and white and increase contrast with levels and curves..
Can not miss some advice to get crisp textures in renders:
- For the final rendering, use the Adaptive DMC antialiasing (min / max – 1 / 16)
- For each texture go into the channel and set Blur: 1.0 -> 0.5 (or less)
- For each texture go into the channel and set: Filtering > summed area (or none)
Finally, a “beauty treatment” in Photoshop > unsharp mask (radius = 1px) will give a nicer look to your woodThe final result can be also accentuated with the Elements and a bit of compositing, but that’s another story.
(by CGblog)
Some articles are updated by us from various sources on the internet. We don't have anything to do with the author.
![CG [M]arket3d](https://blogger.googleusercontent.com/img/b/R29vZ2xl/AVvXsEgH-KRE13TNft6PCKzU2A9XNxdqZ-tSDwP5uiCsPa9Xn0d_k7Tol7x1f2BFik00i9y5nsoMcpAmlu69aMnGhK0tiQTZAfyq_GKX_iDLnpLvnQ-LBNaiMg-KI3joIpWkESj0CZpvaRh0hL8/s1600/Untitled-3.png)


Post a Comment